Table of Contents
How to grow microgreens?
Last winter I got sprouts growing kit and I love it and use it weekly. I love the fact that they appear from ‘nowhere’ in a space of a couple of days. Hence my interest in microgreens now and this guide.
What are microgreens?
Microgreens are edible immature greens. Unlike with sprouts where you eat seeds & roots when having baby greens you only eat the green part of the corp, not the roots. They are usually harvested a month after planting when the plant is up to 2 inches tall and developed the first set of true leaves. In fact, the first set of true leaves’ is the best sign of their readiness to harvest/eat.

Can you grow microgreens without soil?
Yes, you can. If you are not using the soil you can go for a non-water medium such as:
- coconut coir
- vermiculite
- or hydroponics (water-based systems).
Microseeds growing is different from germination. Germination is a process where a seed grows into a plant. Sprouts are seeds that germinate by being soaked and rinsed in water, microgreens are usually grown in a non-water medium.
Why to grow microgreens?
- Easy to grow (simple requirements)
- Take little time and space
- Low cost and ROI – Many microgreens will regrow for several harvests.
- Indoor edible garden. You can grow microgreens indoors in a sunny place, in a mini greenhouse, or outdoors on your balcony.
- Nutrient-dense – they are rich in vitamins, minerals, and phytonutrients that are nutritious. They are packed with flavor, color, texture & enzymes a
- NO CHEMICALS, PESTICIDES or any other harmful substances
- No loss of nutrients as you serve them fresh and raw
What are the health benefits of microgreens?
Microgreens are super healthy & easy to grow and harvest. They are called ‘biogenic’ food, biogenic meaning ‘life generating’ (How Can I Grow and Use Sprouts as Living Food? Isabell Shipard).
They have similar health benefits to sprouts, but greater nutritional value. Furthermore, if you add minerals to the seed raising mix you can boost the nutrient value and flavor of your baby greens.
They have about five times more vitamins and carotenoids than many regular vegetables. Also, microgreens are perfect if you have limited time, space, or gardening skills. Growing microgreens is a good idea now during COVID lockdowns. They are simply perfect salad greens.
Microgreens and illness prevention
Cancer
As microgreens are super-rich in antioxidants they may prevent cells from mutating which causes cancer. They should be added to your diet for cancer prevention alongside any other vegetables rich in polyphenols.
Diabetes
Microgreens can be particularly advised for anyone struggling with glucose level management. It’s believed they can enhance the sugar uptake in the body’s cells due to their high antioxidant levels. This can help minimize the risk of developing type 2 diabetes.
Alzheimer’s & Heart Disease
Any food-rich in polyphenols which are antioxidants(so fruits, veggies and microgreens of course ) lower chances of developing heart disease as well as reduces the incidence of developing Alzheimer’s disease. Furthermore, research has also shown that bad cholesterol (LDL cholesterol) and triglycerides can also be lowered by adding microgreens to meals.
How to grow microgreens at home?
You can learn how to grow microgreens – tasty, nutrient-dense ‘fast food’ – in just a few easy steps.
Growing microgreens at home or indoors will give you control over the environment. For successful indoor microgreens growing you need both stable humidity and temperature. Furthermore, good lighting will be more important and easy to control.
I would potentially go to Amazon to check all the germination equipment they have.
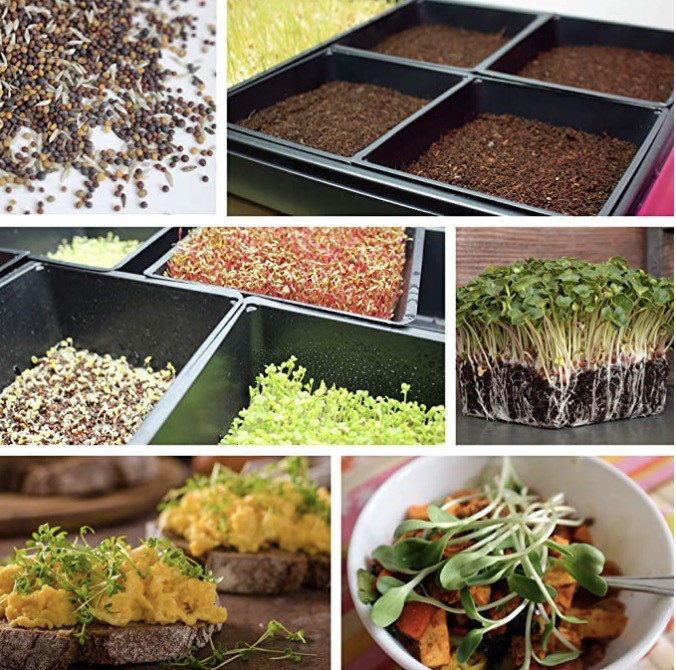
- Microgreen Trays
- Microgreen Seeds
- Soil or another medium
- Light
Microgreen Trays
The best microgreen trays vary. I like perforated ones that you can reuse such as Johnson’s Reusable Growing Tray but for a beginner, I d suggest trying this tray
Initially, you need 2 microgreen trays for each batch of the greens. The top one for soil and the bottom one to ensure drainage. So of course there are no holes in the bottom one.
Microgreen Seeds
Ensure your baby greens seeds are organic or untreated seeds. Commercial seeds often contain pesticides and fungicides. You want to avoid these hence it is worth paying for organic seeds.
Once you try water & seeds you are ready to move on and grow some in the soil.
Microgreen Soil
You can find any potting soil and compost online these days or in your gardening center. I reuse the soil, reducing the costs! I also use our own compost so again the cost is lower and it’s all eco-friendly.
You can easily buy any baby greens kits should you get a fixed starter pack as opposed to finding the accessories and seeds separately. Be warned to go for quality organic seeds, so maybe that won’t be a good idea, after all. You do not want to slip on quality for an easy life 🙂
Microgreens and Light
In areas, with a poor natural grow light grow microgreens using artificial light. Baby greens need light. If sunlight is not a problem south facing window will be your best place to get plenty of the grow light.
UK: TBA
Growing microgreens: outdoors or indoors?
As mentioned above microgreens need light a lot of it. So if you live in sunny California consider yourself lucky but if you are UK-based use artificial lighting. Mild and sunny climates encourage an outdoor exposition, whereas colder weather and lack of sunlight may force you to plant indoors. With the equipment available these days you can have a successful greens ‘farm’ under the roof.
What growing medium is best for microgreens?
The majority of growers choose soil as their preferred growing medium. It offers the best yield and quality of the product, plus is the easiest to work with. However, there are also coconut coir, vermiculite, hydroponics, or other growing mediums depending on your specific needs.
What is the best way to grow microgreens?
Steps for growing greens
- Prepare the soil (you may go for organic soil)– if you are opting for a soil-based tray as else you can have a soilless one or grow microgreens hydroponically (in an aquatic-based environment creating a greenhouse effect for speed of growth). I would go for quality potting soil and compost and mix them 50:50. You may also try coconut coir (UK, US). Baby greens do not require loads of nutrients from the soil but I like to enrich my soil with compost (as it releases nitrogen, phosphorus, potassium). Place the soil – about 2 cm/0.75 inches of it on a tray with holes ensure the other try is underneath so the water goes through it. Distribute the soil evenly so it’s flat across the whole tray.
- Watering the soil – ensure the soil is moist before placing seeds in it. Planting seeds into moist soil removes the need to water the seeds after planting & prevents their displacement. Most microgreens will do best watered with water with a pH of 6. A range of 5.5 to 6.5 is also good. You need to use filtered water to avoid any chlorine from the water.
- Seeds distribution in the soil – some greens germinate better if presoaked.
- Ensure your baby leaves are in the south-facing window for best growth.
Why soak microgreens?
Soaking can help soften a hard seed coat, remove any chemical inhibitors in the seed preventing germination, and helps seeds germinate quickly.
Which microgreens to soak?
Pre-soak larger organic seeds (e.g. mung beans, wheat, peas, beetroot and sunflowers) in warm water for a few hours – anything between 12-48 hours.
Once seeds are ready spread them evenly into the soil and press gently so they sit in the soil.
What’s the best seeding density?
It depends on the variety of seed and the tray size. You can easily calculate seed density here.
Microgreens blackout
Microgreens seeds do not need light for germination. In fact, blackout speeds their growth, so a few days of darkness is what you need. You still need to keep the soil moist.
Don’t confuse seed light requirements with what seedlings need. All seedlings require sunlight. Seedlings will become fragile and will not grow to their potential if they do not have sufficient light.
Psu Edu
What does microgreens blackout mean?
The microgreen blackout time is the length of the period in which trays of microgreens are stacked or covered to prevent light from the seeds. The length of the blackout period depends on the variety and temperature.
Why blackout microgreens?
The blackout period mimics placing soil over the top of your microgreen seeds as you’d typically do when planting in an outside garden.
How often do you water the microgreens during a blackout period?
You need to do it daily or twice a day. Simply uncover the blackout cover and water the seeds, additionally using a water mister may distribute water more evenly on them or help to keep the dry soil moist. Alternatively, place some water in the tray so it’s absorbed by the soil.
How to blackout the seeds?
- Cover them with a mat.
- Stack trays on top of each other.
Usually, after 4-5 days the seeds are ready to move to the sunlight.
Applying pressure on seeds
In order to ensure the seeds have good contact with the soil, you need to apply some weight to it. If there is no weight you will have weak seedlings. The weight should be evenly distributed if possible. Many micro growers use landscape paving for that reason.
Best shelves for microgreens
In order to save space indoors, many people use vertical storage shelving. Like this one. You can place multiple trays there. You can also try to build your own shelving.
Moving the microgreens to light
When the seeds finish sprouting, it’s time to get them to some light.
If you wait a few days before moving the seedlings to light the seedlings will grow upwards while they are not in the light. When in the light they will grow less in height and start maturing.
Microgreens are very “forgiving” regarding the lighting you use. Natural grow light (sunlight) is amazing but if you don’t get much of it make sure to get some artificial lighting instead. People usually buy LED (UK, US) fluorescent lighting. Pro growers use special growth lamps (US, UK). I will write about the best lighting for those mini-plants in a separate post.
How do you prevent mold when microgreen growing?
In order to prevent mold, we need a good temperature and airflow. This is particularly important when our microgreens are grown indoors. When indoors you may place the trays in a place where you have more drafts or you may get a fan to ensure the air fluctuates if you don’t have air conditioning.
Ensure you don’t overwater your seeds as well as keep them at the right temperature, anything between 70-57F /21-23C is ideal. Too cold or too warm temperature will encourage fungi/mould to form. Ensure your pots have drainage holes, so any water excess can run through.
Harvesting
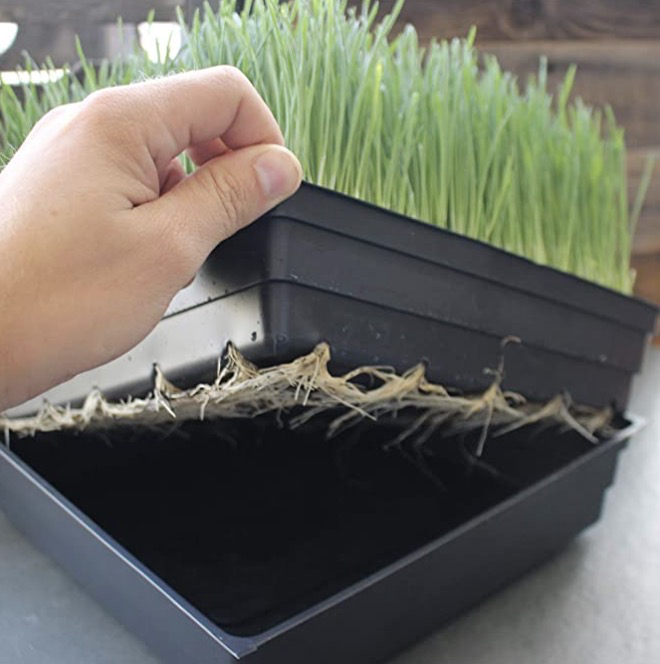
Usually, you get to harvest your microgreens after 7-14 days after planting. The time to grow depends on the variety.
When they get up to 2.5 inches high you can then cut the microgreens with knife scissors about 1inch/2.5cm above the soil. That way you prevent soil from contaminating the final product.
Rinse microgreens, dry eat, and store any excess.
How long do microgreens last?
Most microgreens last at least one week in the fridge, usually two, and often longer. There are many factors that make your microgreens last longer.
How to best store microgreens after harvest?
- Refrigerating them in a plastic bag or container– use those with a semi-open lid to allow a bit of airflow.
- Dehydrating them
Soil disposing
Usually, you may recycle the soil to try to grow another batch of greens, ensure you do add compost so most newly planted seedlings regrow.
Recap questions for total beginners:
1.How to start growing microgreens quickly?
Get microgreen kits (US, UK) and try if it’s for you
Recap questions for total beginners:
1.How to start growing microgreens quickly?
Get microgreen kits (US, UK) and try if it’s for you 🙂
2. Can you grow microgreens in a jar?
Yes. You can find many on Amazon.
3. What are the best microgreens to grow?
All of them are easy to grow but if you are a beginner microgreens planter the most popular microsseds to grow would be for mustard, radish,pea shoots or sunflower.
Furthermore look up amaranth, celery, cabbage, chard, chervil, kale, kohlrabi, lettuce, parsley, peas, rocket/arugula, spinach, and sorrel.
4. What are the healthiest microgreens?
- Amaranth
- Pea shots
- Radish
- Red cabbage
- Sunflower Shoots
- Wheatgrass
5. How Long to Grow Before Harvesting?
The growth time for a microgreen depends on a few factors such as seeds and lighting. They usually grow between 7-14 days.
6. Do microgreens regrow after cutting?
Some types regrow after harvesting, so many of them can be cut several times for example pea shoots.To increase regrowth chances cut them just above the lowest leaf.
7. Any good books on growing microgreens?
- Year-Round Indoor Salad Gardening: How to Grow Nutrient-Dense, Soil-Sprouted Greens in Less Than 10 Days (US, UK)
- Microgreens: A Guide to Growing Nutrient-Packed Greens (US, UK)
- Microgreens: The Insiders Secrets To Growing Gourmet Greens & Building A Wildly Successful Microgreen Business (US, UK)
- Plant Factory: An Indoor Vertical Farming System for Efficient Quality Food Production (US, UK)